


Georeferencing historical maps
Georeferencing technology can be used to explore the history of Queensland through its maps and identify past and present features such as railways, roads, towns and cities.
The process of georeferencing is simple - it involves assigning geographical points in common between old and new maps, which links the historical map to its current spatial location.
The result is that historical maps can be viewed or searched alongside their modern-day counterparts in a mapping system such as the Queensland Globe.
Queensland historical maps georeferencing program
Anyone can get involved in our georeferencing program. With thousands of historical maps dating back to 1841 in our collection, we need your help to give old maps a new life.
With your help, we are creating a library of resources for use in creative ways.
For example, georeferenced maps can be used to:
- create mosaics of historical maps
- create timelines of the same map published across a date range
- perform historical land research and searches.
How to georeference a historical map
Before you start
We recommend first-time users watch the Georeferencer demonstration video.
1. Open the georeferencing application
Click the ‘Open georeferencer’ button to load the application.
The application will open in a side-by-side view, with the historical map appearing on the right and its modern counterpart on the left. On the modern map (left) you will need to zoom in to Queensland to start.
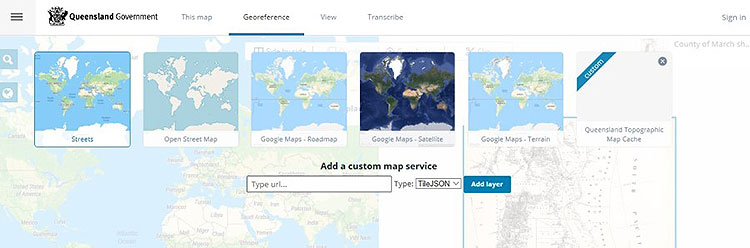
2. Choose a basemap
Zoom into Queensland. Select the earth icon on the left side of your modern map to open up the basemap options. Here you can choose to use one of the standard basemaps or the Queensland Government Topographic Base Map service (QldMap Topo). The Queensland Government service will be easier to use for these maps as it shows more detailed landmarks, roads and land parcels.
3. Identify and assign your points to add features
You can choose to input your points visually (by zooming in and assigning) or by entering coordinates. First, find a recognisable point such as a town, river or road name. Next, find the corresponding location on the modern map. Use the search option at the top left if necessary.
Click on either map to assign your first point and then assign the corresponding point on the other map. Add as many points as you can over the entire map. We recommend you assign 10 to 20 control points to correctly georeference the historical map. Keep in mind that the more points added, the better the map’s accuracy. Existing points can be moved around or deleted if needed.
Make sure you choose points that are unlikely to have changed over time. Built elements such as railways and roads (especially where they intersect) may be more reliable than creeks or coastlines, which may have shifted due to natural processes.
To prevent issues with the georeferencing process, please do not use the latitude and longitude markers on the map.
4. Save your work
Select ‘Save’ to store the points you have added. After saving, you will be given the option to view or compare and overlay the map.
5. Check for accuracy
Select ‘Compare & Overlay’ to see the historical map overlaid on the modern map. Use the opacity slider to check the accuracy of your points. Continue to make any required adjustments by alternating between the georeference and view tabs. Make sure you save any changes each time.
6. Finish
Once you have finished georeferencing a map, you can choose to do another map (click on 'Next', or 'All maps' to select from a list) or close your browser window.
Exporting or uploading maps
If you want to export your georeferenced map or upload maps of your own for georeferencing, you will need to create an account and sign in.
Please note that when you sign in, the information you provide is collected by our software vendor Klokan. You can view Klokan's terms of service and their privacy policy.